
ThermoPro TP20 Manual: A Comprehensive Guide
This manual provides detailed instructions for the TP20 remote food thermometer, offering guidance on setup, operation, and troubleshooting for optimal cooking experiences.
Welcome to the world of precise cooking with the ThermoPro TP20! This advanced wireless meat thermometer is designed to elevate your culinary skills, ensuring perfectly cooked meals every time. The TP20 boasts dual probes, allowing you to monitor both the internal temperature of your food and the temperature of your oven or smoker simultaneously.
This user manual serves as your comprehensive guide to unlocking the full potential of your TP20. Whether you’re a seasoned pitmaster or a novice cook, this device simplifies temperature monitoring, eliminating guesswork and delivering consistent, delicious results. The TP20, manufactured by SHEN ZHEN BUYBEST GROUP COMPANY LIMITED, offers a reliable and convenient solution for achieving culinary perfection. Explore the features and instructions within to master the art of temperature-controlled cooking.
What’s in the Box?
Upon opening your ThermoPro TP20 package, you should find the following components carefully included to ensure a seamless cooking experience. First, you’ll receive the TP20 receiver unit, the central hub for all temperature monitoring. Included are two high-quality stainless steel probes, enabling dual-temperature readings.
Additionally, the box contains a detailed user manual – this very document! – to guide you through setup and operation. You will also find a battery pack to power the receiver, allowing for immediate use. Please verify that all listed items are present and in good condition. If anything is missing or damaged, contact customer support immediately for assistance. The model number, TP-20 IMx, is referenced on the packaging and within the documentation.
Key Features of the TP20
The ThermoPro TP20 boasts several key features designed to elevate your cooking precision and convenience. It features dual probe monitoring, allowing simultaneous tracking of both meat internal temperature and cooker/smoker temperature. A large, backlit LCD screen provides clear readability, even in low-light conditions.
Programmable temperature alarms alert you when your desired temperatures are reached, preventing overcooking or undercooking. The TP20 also includes a timer function for added versatility. Users can easily switch between Celsius and Fahrenheit units. Its robust construction ensures durability, and the long wireless range provides freedom to move around while cooking. The model, 2AI4N-TP20, is known for its reliable performance and user-friendly interface.
Setting Up Your ThermoPro TP20
Begin by unpacking all components and familiarizing yourself with the device; proper setup ensures accurate temperature readings and a seamless cooking experience.
Powering On and Initial Setup
To power on your ThermoPro TP20, press and hold the power button located on the side of the receiver unit for approximately two seconds. The display will illuminate, indicating the device is active. Initially, the TP20 may prompt you to select your preferred units of measurement – Celsius or Fahrenheit – using the corresponding buttons.
Ensure the probes are securely connected to the receiver unit before proceeding. The initial setup also involves verifying the probe connections; a proper connection is crucial for accurate temperature monitoring. The display will show probe icons to confirm connectivity. If a probe isn’t detected, re-insert it firmly.
The TP20 is designed for immediate use, but reviewing the display icons and menu options will enhance your understanding of its capabilities. Familiarize yourself with the alarm settings and probe selection features for a streamlined cooking process.
Pairing the Probes
The ThermoPro TP20 utilizes wireless probes that require pairing with the receiver unit for optimal functionality. Typically, the probes are pre-paired at the factory, but re-pairing might be necessary if connection issues arise. To initiate pairing, insert the batteries into each probe, ensuring correct polarity.
On the receiver, navigate to the probe pairing mode – usually accessible through the menu settings. The receiver will begin searching for signals from the probes. Simultaneously, briefly press the button on each probe; this signals its availability for pairing.
Once a probe is detected, the receiver display will show a corresponding probe icon. Repeat this process for each probe. Successful pairing is indicated by stable probe readings on the display. If pairing fails, ensure the probes are within range and retry the process.
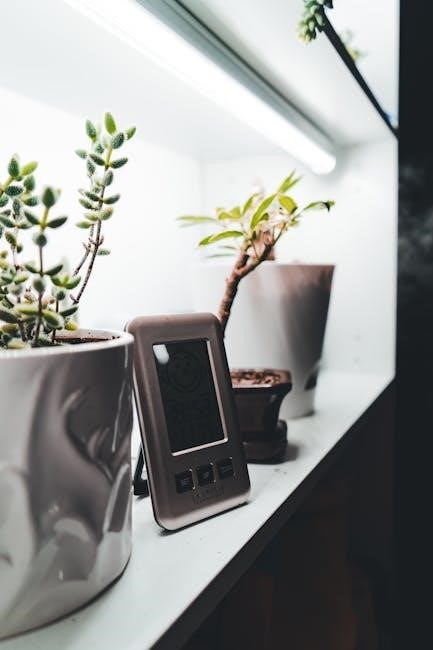
Understanding the Display
The ThermoPro TP20 features a clear, backlit LCD display providing crucial cooking information at a glance. The primary display area shows the real-time temperature readings from both probes – Probe 1 and Probe 2 – simultaneously. Icons indicate which probe is currently selected for monitoring or alarm settings.

A battery level indicator keeps you informed about the receiver’s power status. Signal strength icons display the connection quality between the receiver and each probe, alerting you to potential range issues. The display also shows alarm settings, including target temperatures and timer durations.
Additional icons indicate units of measurement (Celsius or Fahrenheit) and other active functions like the timer. Familiarizing yourself with these display elements ensures efficient and accurate temperature monitoring during cooking.

Using the ThermoPro TP20 for Cooking
Effectively utilize the TP20’s dual probes to monitor both your food’s internal temperature and the cooking environment, ensuring perfectly cooked meals every time.
Setting Temperature Alarms
The ThermoPro TP20 allows you to set custom temperature alarms for both probes, ensuring you’re alerted when your food reaches the desired level of doneness or when your cooking environment fluctuates outside of your preferred range. To set an alarm, navigate to the alarm setting menu using the buttons on the device.
You can then input your target temperature for each probe individually. The TP20 will emit an audible alert when the set temperature is reached, preventing overcooking or undercooking. This feature is particularly useful when multitasking or stepping away from the cooking process; Remember to verify the alarm settings before starting to cook, and adjust as needed based on your recipe and preferences. Properly configured alarms contribute significantly to consistent and successful cooking results.

Using the Dual Probe Functionality
The ThermoPro TP20’s standout feature is its dual probe capability, allowing simultaneous monitoring of both internal food temperature and the temperature of your oven, grill, or smoker. This provides a comprehensive overview of the entire cooking process. To utilize this, simply insert one probe into the thickest part of the meat, avoiding bone, and the other into the cooking environment.
The display clearly shows readings from both probes concurrently, enabling precise control and adjustments. This is invaluable for achieving perfectly cooked results, especially with larger cuts of meat or extended cooking times. Effectively using both probes eliminates guesswork and ensures consistent, delicious outcomes. Experiment with different probe placements to optimize monitoring for your specific cooking setup.
Monitoring Internal Meat Temperature
Accurately gauging internal meat temperature is crucial for food safety and achieving desired doneness. With the ThermoPro TP20, insert the probe into the thickest part of the meat, ensuring it avoids bone, fat, or gristle for a precise reading. Proper probe placement guarantees representative temperature data.
Regularly check the temperature throughout the cooking process, referencing a reliable temperature guide for your specific meat type. The TP20’s rapid response time delivers near-instantaneous updates. Utilize the alarm function to alert you when the meat reaches your target temperature, preventing overcooking or undercooking. Consistent monitoring ensures a safe and flavorful culinary experience.

Monitoring Oven/Smoker Temperature
Maintaining consistent oven or smoker temperature is vital for successful cooking, especially during extended smoking sessions. The ThermoPro TP20’s second probe excels at this task. Position the probe through the vent or a dedicated port, ensuring it’s centered within the cooking chamber, away from direct heat sources. This placement provides an accurate representation of the overall cooking environment.
Regularly observe the temperature readings on the TP20’s display, making adjustments to your oven or smoker as needed to maintain your desired temperature. Leverage the high/low temperature recording feature to track fluctuations and optimize your cooking process. Consistent temperature control leads to evenly cooked, flavorful results.

Advanced Features & Troubleshooting
Explore the TP20’s backlight, timer, and unit settings for enhanced usability. This section also addresses common issues and provides effective troubleshooting solutions.
Backlight Functionality
The ThermoPro TP20 features a convenient backlight function designed to enhance visibility in low-light cooking environments. This is particularly useful when grilling outdoors at night, or when monitoring temperatures in dimly lit kitchens. Activating the backlight ensures you can easily read temperature readings without needing additional light sources.
To activate the backlight, simply press the LIGHT button located on the front of the thermometer. A single press will illuminate the display, making it instantly readable. Pressing the LIGHT button again will turn the backlight off. The backlight automatically shuts off after a period of inactivity to conserve battery life. This automatic shut-off feature prevents unnecessary battery drain during extended cooking sessions.
The brightness level of the backlight is pre-set for optimal visibility, but it’s designed to be clear and easy on the eyes, even during prolonged use. Utilizing the backlight function contributes to a safer and more enjoyable cooking experience, especially when precise temperature monitoring is crucial.
Timer Function
The ThermoPro TP20 incorporates a built-in timer function, adding another layer of convenience to your cooking process. This feature allows you to accurately track cooking times without needing a separate timer device. It’s ideal for recipes requiring precise timing, ensuring your dishes are cooked to perfection.
To set the timer, press and hold the TIMER button. The display will begin to flash, indicating that you can adjust the desired time using the UP and DOWN buttons. Once the desired time is set, press the TIMER button again to start the countdown. The timer will beep when the set time has elapsed.
The timer can run concurrently with temperature monitoring, providing a comprehensive cooking management system. The TP20’s timer is a valuable tool for maintaining control and achieving consistent results in all your culinary endeavors, simplifying complex recipes and enhancing your overall cooking experience.
Units of Measurement (Celsius/Fahrenheit)
The ThermoPro TP20 offers the flexibility to display temperatures in either Celsius or Fahrenheit, catering to user preference and recipe requirements. This adaptability makes the thermometer suitable for cooks worldwide, regardless of their customary unit of measurement.
To switch between Celsius and Fahrenheit, locate the UNIT button on the device. Pressing this button will toggle the display between the two scales. The current setting will be immediately reflected on the screen, allowing for quick and easy adjustments.
This feature ensures accurate temperature readings regardless of the chosen scale, providing consistent results. Whether you’re following a recipe in Celsius or Fahrenheit, the TP20 delivers precise measurements, enhancing your cooking precision and overall culinary experience. Remember to confirm the correct unit before monitoring temperatures.
Troubleshooting Common Issues
Encountering issues with your ThermoPro TP20? Here’s a quick guide to resolve common problems. If the thermometer doesn’t power on, ensure fresh batteries are correctly installed. For probe connectivity issues, re-pair the probes following the initial setup instructions. A weak signal might indicate distance limitations; move the base unit closer to the thermometer.
Inaccurate readings could stem from improper probe placement – ensure it’s inserted correctly into the thickest part of the food. If the display freezes, try resetting the device by removing and reinserting the batteries.
If problems persist, consult the full user manual or contact ThermoPro support. Regularly checking battery levels and probe connections can prevent many issues, ensuring a seamless cooking experience. Remember to avoid exposing the thermometer to extreme temperatures or moisture.

Care and Maintenance
Proper care extends the life of your TP20. Regularly clean the probes, replace batteries as needed, and store the unit in a cool, dry location.
Cleaning the Probes
Maintaining clean probes is crucial for accurate temperature readings and preventing cross-contamination. After each use, wipe the stainless steel probes with a damp cloth and mild soap. Avoid abrasive cleaners, as they can damage the probe’s surface.
Ensure no soap residue remains, as this could affect readings. For stubborn food residue, a slightly warmer, soapy water solution can be used, followed by a thorough rinse. Never immerse the probe handles or the thermometer body in water, as this will cause damage.
Regular cleaning not only ensures hygiene but also prolongs the lifespan of your ThermoPro TP20 probes, guaranteeing consistent and reliable performance during all your cooking endeavors. Disinfecting the probes with a food-safe sanitizer is also recommended periodically.
Battery Replacement
The ThermoPro TP20 operates on AAA batteries, and low battery power will be indicated on the display. To replace the batteries, locate the battery compartment on the back of the receiver unit. Gently slide open the compartment cover.
Remove the old batteries and insert two new AAA batteries, ensuring correct polarity as indicated inside the compartment (+ and -). Always replace both batteries simultaneously to maintain consistent performance and avoid potential inaccuracies.
Close the battery compartment cover securely. Using high-quality alkaline batteries is recommended for extended use. Dispose of used batteries responsibly, following local regulations. Regular battery checks will ensure your TP20 is always ready for precise temperature monitoring during cooking.
Storage Guidelines
Proper storage will extend the lifespan of your ThermoPro TP20. When not in use for extended periods, remove the batteries from both the receiver and the probes to prevent corrosion and potential damage. Clean the probes thoroughly before storing, as detailed in the ‘Cleaning the Probes’ section.
Store the receiver and probes in a cool, dry place, away from direct sunlight and extreme temperatures. Avoid storing the device in areas with high humidity, which could affect its electronic components.
A protective case or pouch is recommended to prevent physical damage to the receiver during storage. Keep the unit out of reach of children. Following these guidelines will ensure your TP20 remains in optimal condition for years of reliable cooking assistance.
Safety Precautions
Always exercise caution when handling hot probes and surfaces. Never touch the metal probe during or immediately after cooking; prioritize safe operation.
Probe Safety
The probes are constructed of stainless steel and are designed for inserting into food. However, extreme care must be taken when handling them, as they become very hot during cooking and can cause burns. Always use oven mitts or heat-resistant gloves when handling probes after use, even if they appear to have cooled down.
Never leave hot probes unattended or within reach of children. Ensure the probes are securely inserted into the food to prevent accidental contact. Avoid bending or damaging the probe wires, as this could compromise their functionality and potentially create a safety hazard. Regularly inspect the probes for any signs of damage, such as cracks or corrosion, and replace them if necessary.
Do not immerse the probe handles or cable in water or other liquids. Only the stainless steel portion of the probe is designed for contact with food and liquids. Proper probe care will ensure safe and accurate temperature readings.

General Safety Information
This ThermoPro TP20 is intended for household use only and should not be used for commercial purposes. Keep the thermometer and its components out of reach of children to prevent accidental ingestion or misuse. Do not attempt to disassemble or repair the device yourself, as this could void the warranty and create a safety hazard.
Avoid exposing the thermometer to extreme temperatures or humidity, as this can damage the internal components. Do not use abrasive cleaners or solvents to clean the device, as they can scratch the surface or damage the electronics. Always ensure the thermometer is dry before storing it.
Handle the device with care and avoid dropping it, as this could cause damage. If the device is damaged, discontinue use immediately and contact customer support. Follow all safety precautions outlined in this manual to ensure safe and reliable operation.